Five best ways to see Before and After changes in Lightroom!
The Before and After in Lightroom Classic is a unique view that will show you how the edits affect your original image.
You can arrange this view in various ways, like the original and final images side by side, left to right, top and bottom split, etc.
But what you are always going to see is the image comparison – imported original vs final image with all changes. But that’s only the standard way.
I really like Lightroom Classic because, in this app, you can actually preview the before and after in many different ways!
It only depends on whether you want to see the difference made by local or global adjustment tools, individual changes, or your final image.
You can preview changes in Lightroom CC (the cloud version) and Lightroom mobile but only in its basic form.
In this tutorial, I will concentrate on the desktop version, and show you my 5 favourite ways to quickly see the before and after changes in Lightroom Classic, with shortcuts for Mac and Pc.
1. Use the traditional Cmd+Z “Undo” keyboard shortcut.
The Cmd+Z “undo” method is by far the quickest way to see before and after in Lightroom – to preview how the last edit is affecting your image.
After you’ve made some changes to an image, press on the keyboard Cmd+Z on a Mac and Ctrl+Z on Pc, and the very last adjustment will be undone. You can do that a few times to undo multiple stages.
Similarly, to bring back the changes and “redo” the process, press Cmd+Sift+Z on Mac and Ctrl+Shift+Z on Pc.
This is especially useful if you want to try the Auto feature (automatic develop setting) in the Basic panel. Hit the Cmd+U on the keyboard to let Lightroom analyze your image and apply the “optimal” settings for you.
In many cases, this can give you some good directions on where to go with your edits, but sometimes this can actually make your picture look terrible. That’s why we have all the adjustment sliders listed separately, and we can make the adjustments the way we want.
If you don’t like the auto changes – remember to press the Cmd+Z to revert the changes and return to the before state.
By the way, both of the above keyboard shortcuts work in Lightroom Classic and the CC cloud version.


Lightroom before and after example
Where is the Undo button in Lightroom Mobile?
In Lightroom Mobile, the undo/redo is represented by an arrow at the top of the app view.
By default, it is in the undo state, but if you tap and hold, the redo action will be shown below.
Simply swipe with your finger to select the action you desire.
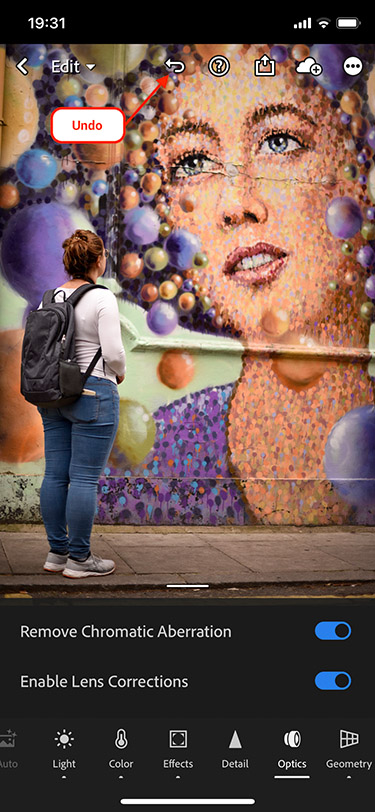
Lightroom Mobile – the “undo” arrow icon
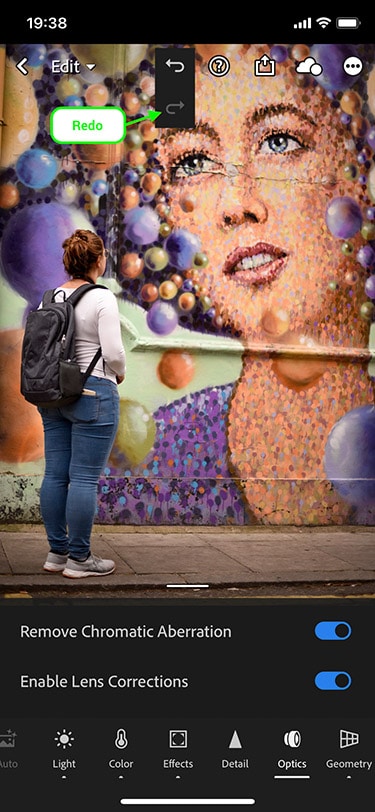
Lightroom Mobile – the “redo” icon
2. Preview changes in the History panel.
The History panel records all the changes related to the particular image right from the very beginning – the import stage.
This will be your best friend if you want to see all the individual before and after adjustments you’ve made while editing your image.
In the History panel, you can preview/undo every brushstroke, every filter, every preset, picture profile.
As well as all these subtle changes you might have applied to the shadows, highlights, blacks, etc…
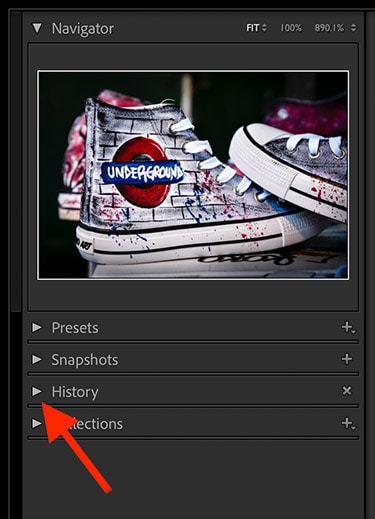
Lightroom Classic – History panel collapsed view
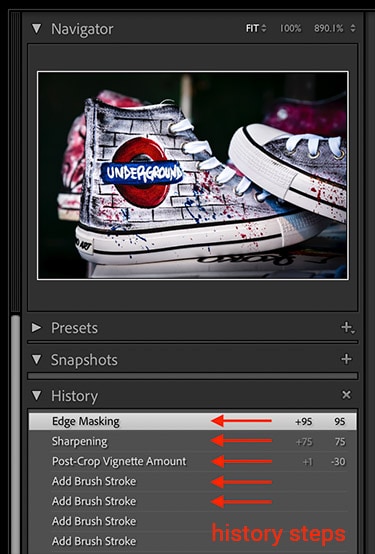
Expanded History panel shows all the editing steps
How do I find previous edits in Lightroom?
If you expand the History panel and hover over the history steps, you’ll see a live preview of each step (edits) appear at the top in the Navigator panel.
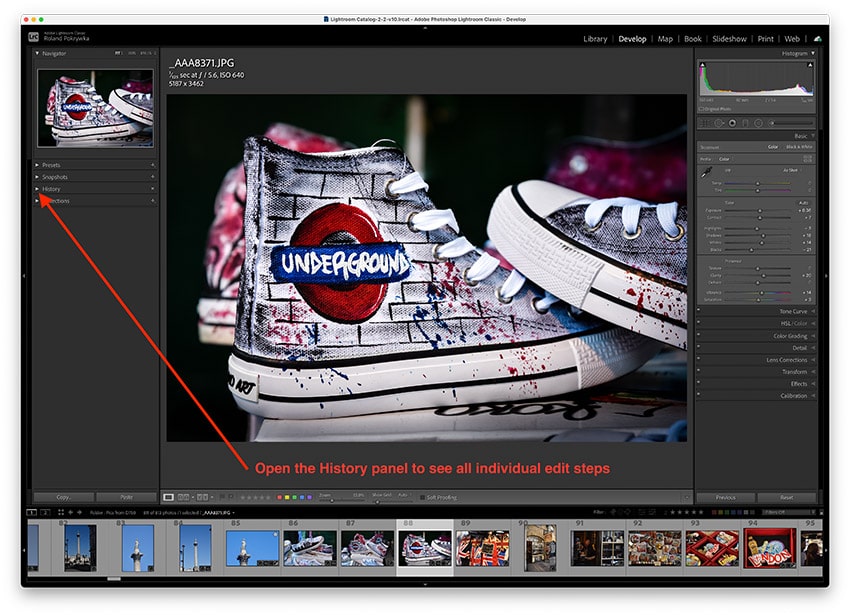
However, if you want to see the changes on your main image, you have to actually click each history step – not just hover over it.
As you move up, you will see the most recent changes and earlier adjustments as you go down.
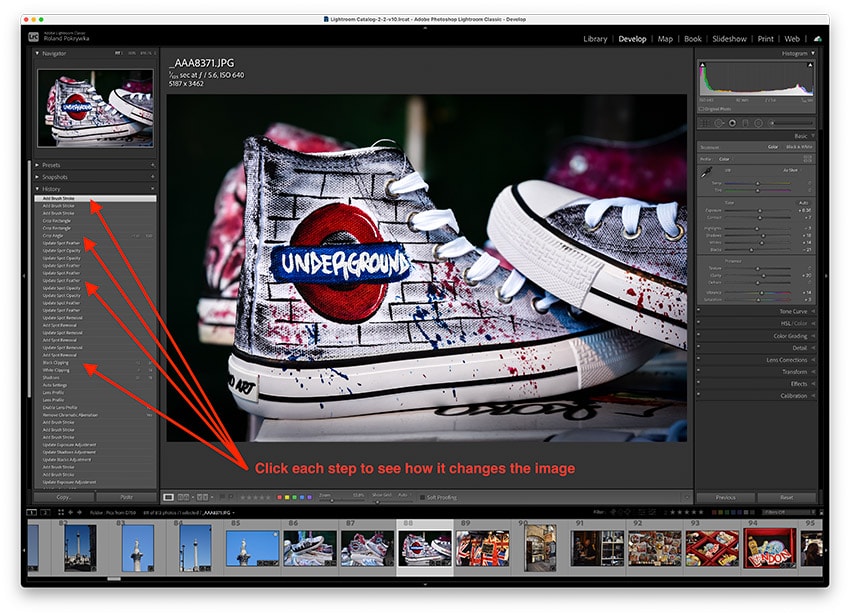
If you don’t fancy some of those changes anymore, right-click the last step you like and select “Clear History Above This Step“.
Where is the History panel in Lightroom CC?
Unfortunately, there is no history panel in Lightroom CC and Mobile apps. Yes, this is really disappointing, but I am afraid you won’t view a history of your edits in these apps.
3. Switch On|Off individual adjustment tools and panels.
In the Develop module in Lightroom Classic on the right-hand side, you will find adjustment panels like Basic, Tone Curve, HSL, Detail, Lens Corrections and more.
These panels are responsible for the “global” adjustments – meaning the changes we make in them will affect the whole image.
At the top, just below the Histogram, you will also find tools like Spot Removal, Graduated Filter, Radial Filter and Adjustment Brush, thanks to which you can make more precise adjustments – only to specific areas of an image. Thus we can refer to them as tools for “local” adjustments.
To view the before and after in Lightroom and see how a particular tool/panel affects the image, use the toggle switch located in the bottom left-hand corner of each adjustment panel.
When you switch it on (up position), you will enable the panel and see the After effect. Similarly, when you switch it off (down state), you will disable the panel and see the Before.
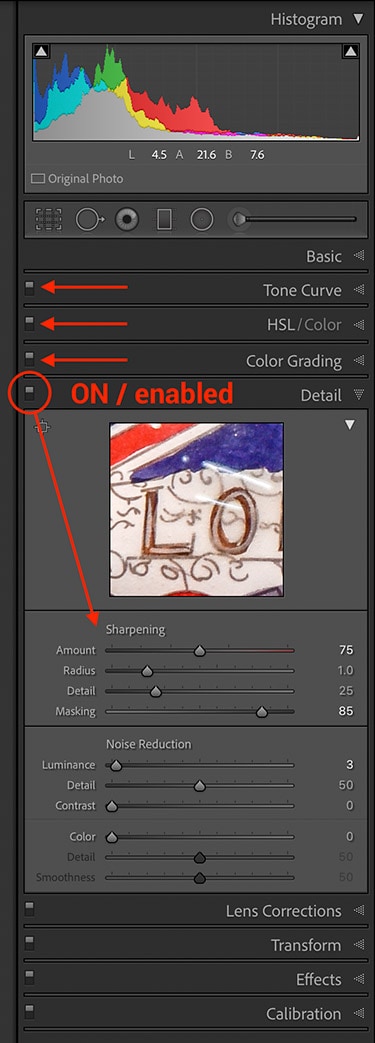
On position – panel and adjustments are active
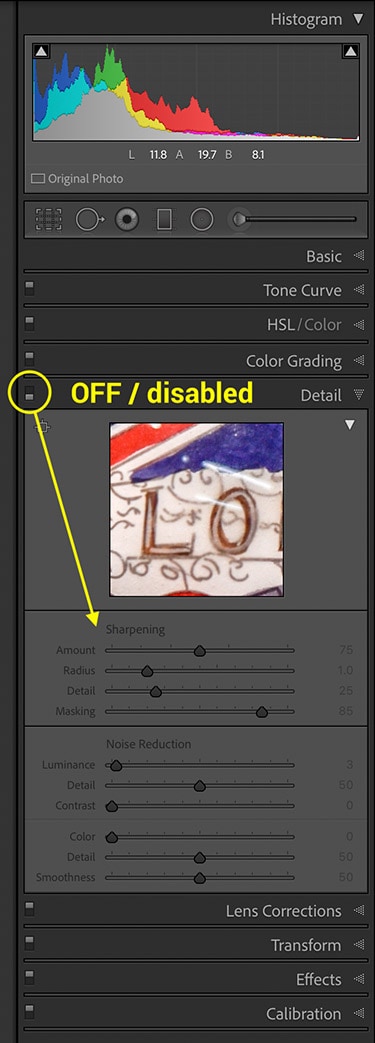
Off position – panel and adjustments are greyed out
You may have already noticed that the Basic panel does not have the On/Off switch (… why?) so and here comes the Undo – Cmd+Z super handy shortcut!
I find this On/Off – before and after Lightroom technique especially helpful when I am using the Spot Removal tool. There are two options – Clone and Heal. I work with the Healing Brush to remove dust spots. And then switch the panel On/Off to see if all of the spots are gone.
I also use it a lot for portrait retouch. For example, in the History panel, I can go back step by step and see all the individual brush strokes. But here, by using the on/off switch on the Adjustment Brush panel, I can quickly see the full effect – adding/removing all the brush strokes (skin smooth, enhancing iris, whitening teeth etc..).
Can I enable and disable panels in Lightroom Cloud CC?
Yes, similar functionality exists in Lightroom CC, but it is limited to only main panels, not local adjustment tools like Spot Removal or Graduated Filter.
To preview changes, you have to press and hold eye icons. These are located in each panel’s top right-hand corners.
The eye icon will only be displayed next to the panels that were used to make adjustments.
If no edits were made – the eye icon will not be visible.
Eye icon – panel and adjustments are active
Eye icon crossed out – changes are not visible
There are no switches and no eye icons in the Lightroom Mobile app.
4. Swap between the original and final image with backslash \ key.
This is the most basic form of the before and after in Lightroom, but I guarantee that you will use it a lot!
Press the backslash \ once to show the before – original image, and hit it again to show the after preview – final image version.
Now, you would expect that this shortcut will work in full-screen. Sadly, it does not.
When you activate the full-screen preview – the shortcut for this is a letter F on the keyboard. You will see the picture in the After state, and if you press the backslash \ to swap for the Before, unfortunately, you will return to the regular Develop module view. Not what many of us would expect…


Lightroom before and after example
How to get before and after view in Lightroom in the full screen mode?
Unfortunately, as of the time of writing this tutorial – 2021, the before and after image swap is not supported in full screen.
However, you can use this nice little hack to see the before (original) and after (final) image in Lightroom Classic in an almost full-screen preview.
- Press Shift+Cmd+F and this will maximize the Lightroom application window and hide all the panels.
- Press L twice – to activate the Lights Out mode and dim everything apart from the image.
- Finally, press the \ to swap between before and after states.
Fullscreen mode in Lightroom Classic. All panels are hidden. Lights Out mode blacks out the app’s interface.
To return to the original view, press L once again and Shift+Cmd+F to bring the original Lightroom application window size. Alternatively, press Shift+F a few times to flip between all the different views.
You can use the exact same backslash \ keyboard shortcut to see the before and after in Lightroom CC.
In Lightroom Mobile, tap and hold over the image. When you press the screen, you will see the before state. Lift a finger to return to the final/current view.
5. Use dedicated Before and After view.
There is a special Before and After view in Lightroom Classic and Lightroom CC, however, the latter is very basic and can only show either the original or final state.
Lightroom Classic is much more sophisticated and provides four unique views, where you can see and compare both versions simultaneously side by side or as split-screen.
How to view before and after in Lightroom side by side?
- First, make sure you are in the Develop module (shortcut is D), now use one of the following two keyboard shortcuts:
- Y will activate Left | Right side by side view
- Alt + Y (Windows) or Option + Y on Mac will activate Top / Bottom view
You can swap the default side by side view to a half-half split-screen view using the Shift + Y shortcut.
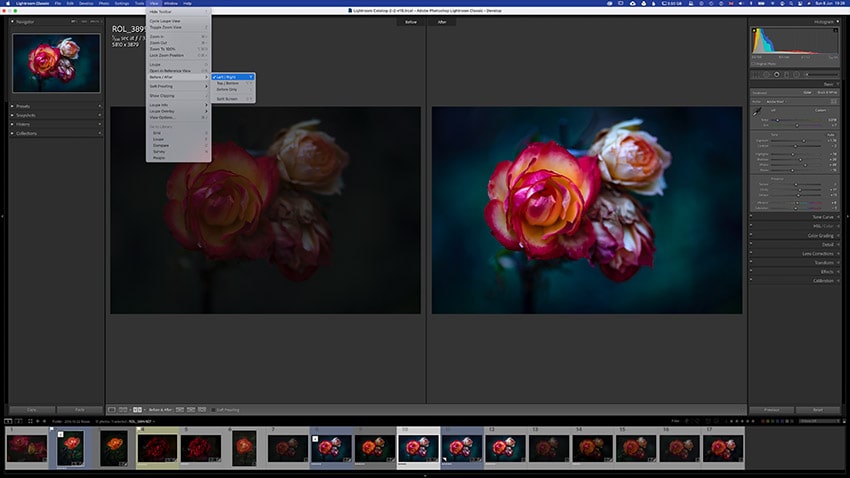
Lightroom Classic – Before and After left-right side by side view
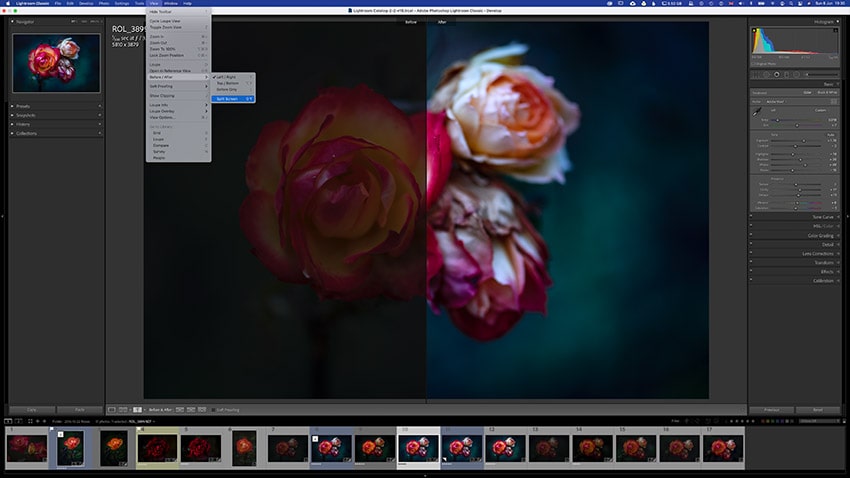
Lightroom Classic – Before and After left to right split view
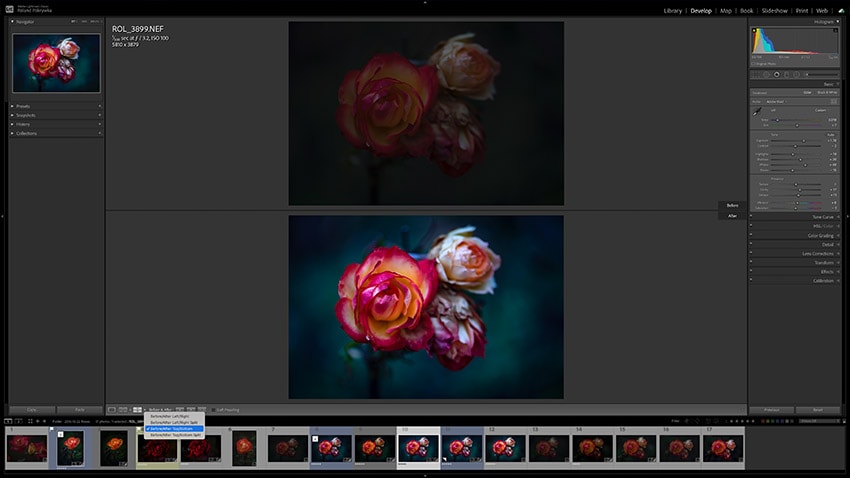
Before and After in Lightroom Classic top-bottom view
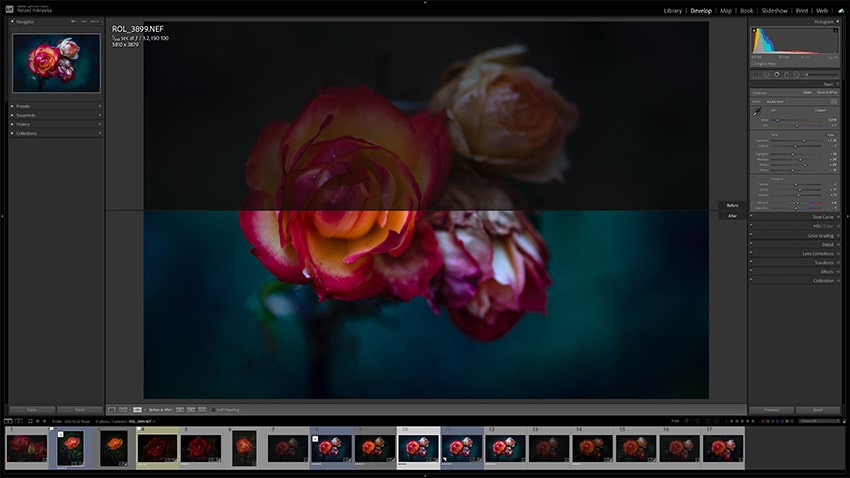
Before and After in Lightroom Classic top to bottom split view
I am a fan of Lightroom keyboard shortcuts, however, you can also access these special views in Lightroom Classic by going to the main application menu, and selecting for example:
View > Before/After > Left/Right
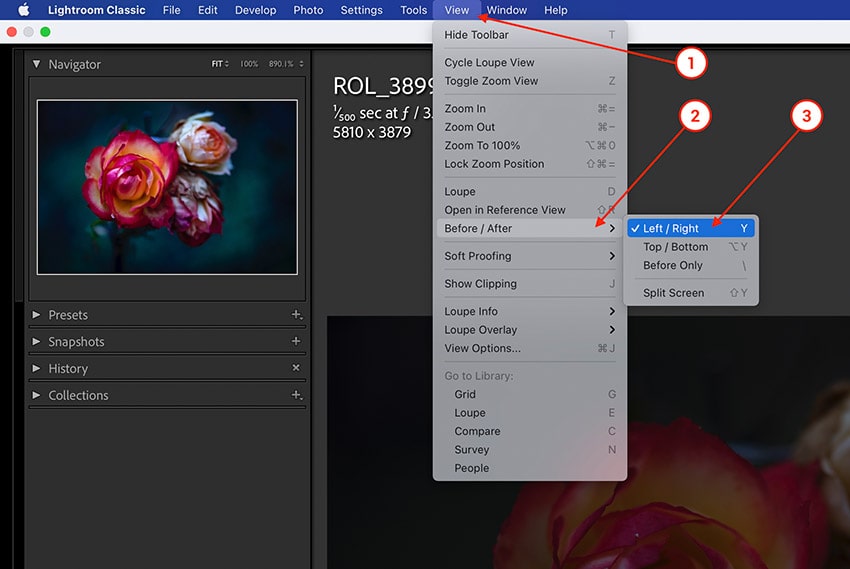
Lightroom Classic menu: View > Before/After > Left/Right
You can also cycle between all four Before /After views by navigating these previews.
They are located in the left-bottom corner – just below the image. Look for the Copy and Paste buttons, next to them will be the Loupe View, Reference View and the third is Before/After view.
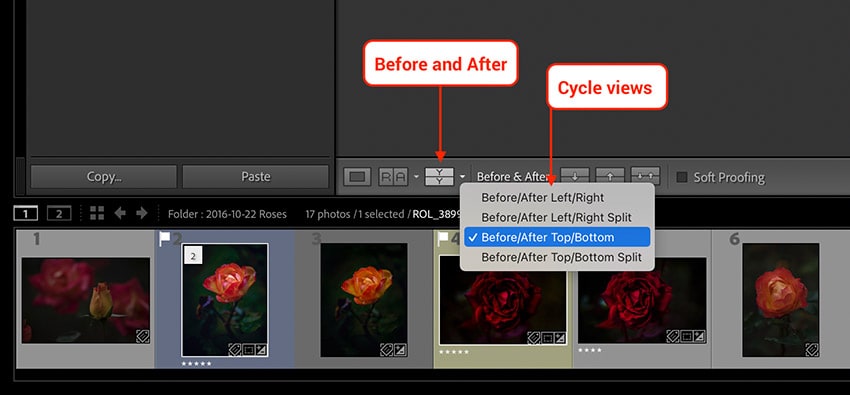
Cycle between all four Before /After views by navigating previews.
Lightroom Cloud CC only offers a very basic before and after view where you can see only the whole image.
To do that, look for a small split-screen icon in the bottom right-hand corner. Press the icon to see the “original”, press once more to see the “final” version of the image.
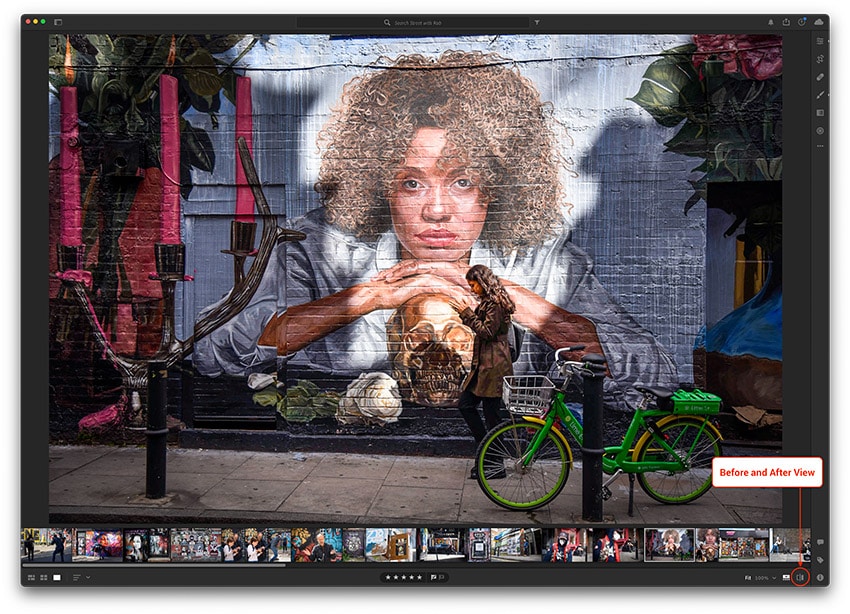
Before and After view in Lightroom Cloud CC
Conclusion
I hope you found this helpful! You can find more Lightroom tutorials in the archive section.
I can think about three extra ways to see the Before and After previews in Lightroom Classic:
- Use the White Balance Selector and see the preview appear in the Navigator window
- Hover over the Preset to see the preview on the main image
- Hover over the colour profile in the Profile Browser to see how it can artistically change your image
If you know any other, please let me know in the comments below.
And maybe buy me a coffee – need that a lot – long tutorials take time…


